GIGABYTE Z690 AORUS MASTER Motherboard Overview

You were the chosen one!
(Kent’s blog-style exploration of his personal rig update continues, and this second part explores the motherboard he chose as the home for his new Core i9-12900KS CPU. – SP)
In Episode 1, we were introduced to the young Anakin Sky…no wait, that’s a different series. (Ahem.) In part one of my personal rig update I introduced the reasons behind my need for this update, as well as laying out my ‘illogical’ decision making on the processor and platform I decided to go with. While it may not have been the wisest or well-thought out decision, I’m pretty happy with the outcome so far.
In this installment, I’ll be detailing the thought process I went through in choosing a motherboard to go with the Intel Core i9-12900KS, as well as a brief product overview of my choice, the GIGABYTE Z690 AORUS MASTER.
Motherboard features (via GIGABYTE):

Intel Z690 AORUS Motherboard with Direct 19+1+2 Phases Digital VRM Design, DDR5 XTREME MEMORY Design, Fins-Array III Heatsink, Direct-Touch Heatpipe II, NanoCarbon Baseplate, M.2 Thermal Guard III, 125dB ESS Sabre Audio, Intel WIFI 6E 802.11ax, AQUANTIA 10GbE LAN
- Support 12th Gen Intel Series Processors
- Dual Channel Non-ECC Unbuffered DDR5, 4 DIMMs
- Direct 19+1+2 Phases VRM Design with 105A Power Stage* and Tantalum Polymer Capacitor
- DDR5 XTREME MEMORY Design with SMD DIMM and Shielded Memory Routing
- Advanced Thermal Solution with NanoCarbon Fins-Array III Heatsink, Direct-Touch Heatpipe II and NanoCarbon Baseplate
- Intel WIFI 6E 802.11ax 2T2R & BT5 with AORUS Antenna
- Audio Solution with ESS Sabre ES9118 125dB on Rear Audio
- AQUANTIA 10GbE BASE-T LAN
- 5 x Ultra-Fast NVMe PCIe 4.0/3.0 x4 M.2 with Thermal Guards
- RGB FUSION 2.0 with Multi-Zone Addressable LED Light Show Design, Support Addressable LED & RGB LED Strips
- Smart Fan 6 Features Multiple Temperature Sensors, Hybrid Fan Headers with FAN STOP and Noise Detection
- Q-Flash Plus Update BIOS without Installing the CPU, Memory and Graphics Card
* Power Stage maximum current capacity is based on VCORE Phase.
Product Specifications
- CPU: LGA1700 socket:
- Support for 12th Generation Intel Core, Pentium Gold and Celeron Processors (please refer to “CPU Support List” for more information)
- L3 cache varies with CPU
- Chipset: Intel Z690 Express Chipset
- Memory:
- Support for DDR5 6400(O.C.) / 6200(O.C.) / 6000(O.C.) / 5800(O.C.) / 5600(O.C.) / 5400(O.C.) / 5200(O.C.) / 4800 / 4000 MHz memory modules
- 4 x DDR5 DIMM sockets supporting up to 128 GB (32 GB single DIMM capacity) of system memory
- Dual channel memory architecture
- Support for ECC Un-buffered DIMM 1Rx8/2Rx8 memory modules (operate in non-ECC mode)
- Support for non-ECC Un-buffered DIMM 1Rx8/2Rx8/1Rx16 memory modules
- Support for Extreme Memory Profile (XMP) memory modules
- (Please refer “Memory Support List” for more information)
- Onboard Graphics:
- Integrated Graphics Processor-Intel HD Graphics support:1 x DisplayPort, supporting a maximum resolution of 4096×2304@60 Hz
- * Support for DisplayPort 1.2 version and HDCP 2.3
- (Graphics specifications may vary depending on CPU support)
- Audio:
- Realtek ALC1220-VB CODEC
- ESS ES9118 DAC chip
- Support for DTS:X Ultra
- High Definition Audio
- 2/4/5.1/7.1-channel
- Support for S/PDIF Out
- The front panel line out jack supports DSD audio
- LAN:
- Marvell AQtion AQC113C 10GbE LAN chip (10 Gbps/5 Gbps/2.5 Gbps/1 Gbps/100 Mbps)
- Wireless Communication module:
- WIFI Module: WIFI a, b, g, n, ac, ax, supporting 2.4/5/6 GHz carrier frequency bands
- Support for 11ax 160MHz wireless standard and up to 2.4 Gbps data rate
- Bluetooth 5.2
- * Actual data rate may vary depending on environment and equipment
- Expansion Slots:
- 1 x PCI Express x16 slot, running at x16 (PCIEX16)
- * For optimum performance, if only one PCI Express graphics card is to be installed, be sure to install it in the PCIEX16 slot.
- (The PCIEX16 slot conforms to PCI Express 5.0 standard.)
- 2 x PCI Express x16 slots, running at x4 (PCIEX4_1, PCIEX4_2)
- * The PCIEX4_1 slot shares bandwidth with the M2C_SB connector. The PCIEX4_1 slot becomes unavailable when a device is installed in the M2C_SB connector.
- (The PCIEX4 slots conform to PCI Express 3.0 standard.)
- 1 x PCI Express x16 slot, running at x16 (PCIEX16)
- Multi-Graphics Technology: Support for AMD Quad-GPU CrossFire and 2-Way AMD CrossFire technologies
- Storage Interface:
- CPU:
- 1 x M.2 connector (Socket 3, M key, type 2260/2280/22110 PCIe 4.0 x4/x2 SSD support) (M2A_CPU)
- Chipset:
- 2 x M.2 connectors (Socket 3, M key, type 2260/2280/22110 PCIe 4.0 x4/x2 SSD support) (M2P_SB, M2Q_SB)
- 1 x M.2 connector (Socket 3, M key, type 2242/2260/2280 PCIe 3.0 x4/x2 SSD support) (M2C_SB)
- 1 x M.2 connector (Socket 3, M key, type 2242/2260/2280 SATA and PCIe 4.0 x4/x2 SSD support) (M2M_SB)
- 6 x SATA 6Gb/s connectors
- Support for RAID 0, RAID 1, RAID 5, and RAID 10
- * Refer to “2-8 Internal Connectors,” for the installation notices for the PCIEX4_1, M.2, and SATA connectors.
- Intel Optane Memory Ready
- * System acceleration with Intel Optane Memory can only be enabled on the M.2 connectors supported by the Chipset.
- CPU:
- USB:
- Chipset:
- 2 x USB Type-C ports, with USB 3.2 Gen 2×2 support
- (1 port on the back panel, 1 port available through the internal USB header)
- 3 x USB 3.2 Gen 2 Type-A ports (red) on the back panel
- Chipset+USB 3.2 Gen 2 Hub:
- 1 x USB Type-C port on the back panel, with USB 3.2 Gen 2 support
- 2 x USB 3.2 Gen 2 Type-A ports (red) on the back panel
- Chipset+2 USB 3.2 Gen 1 Hubs:
- 8 x USB 3.2 Gen 1 ports (4 ports on the back panel, 4 ports available through the internal USB headers)
- Chipset+USB 2.0 Hub:
- 4 x USB 2.0/1.1 ports available through the internal USB headers
- Chipset:
- Internal I/O Connectors:
- 1 x 24-pin ATX main power connector
- 2 x 8-pin ATX 12V power connectors
- 1 x CPU fan header
- 1 x water cooling CPU fan header
- 4 x system fan headers
- 4 x system fan/water cooling pump headers
- 2 x addressable LED strip headers
- 2 x RGB LED strip headers
- 5 x M.2 Socket 3 connectors
- 6 x SATA 6Gb/s connectors
- 1 x front panel header
- 1 x front panel audio header
- 1 x USB Type-C header, with USB 3.2 Gen 2×2 support
- 2 x USB 3.2 Gen 1 headers
- 2 x USB 2.0/1.1 headers
- 1 x noise detection header
- 2 x Thunderbolt add-in card connectors
- 1 x Trusted Platform Module header (For the GC-TPM2.0 SPI/GC-TPM2.0 SPI 2.0 module only)
- 1 x power button
- 1 x reset button
- 1 x reset jumper
- 1 x Clear CMOS jumper
- 2 x temperature sensor headers
- Voltage Measurement Points
- Back Panel Connectors:
- 1 x Q-Flash Plus button
- 1 x Clear CMOS button
- 2 x SMA antenna connectors (2T2R)
- 1 x DisplayPort
- 1 x USB Type-C port, with USB 3.2 Gen 2 support
- 1 x USB Type-C port, with USB 3.2 Gen 2×2 support
- 5 x USB 3.2 Gen 2 Type-A ports (red)
- 4 x USB 3.2 Gen 1 ports
- 1 x RJ-45 port
- 1 x optical S/PDIF Out connector
- 5 x audio jacks
- I/O Controller: iTE I/O Controller Chip
- Hardware Monitoring:
- Voltage detection
- Temperature detection
- Fan speed detection
- Water cooling flow rate detection
- Fan fail warning
- Fan speed control
- * Whether the fan (pump) speed control function is supported will depend on the fan (pump) you install.
- Noise detection
- BIOS:
- 1 x 256 Mbit flash
- Use of licensed AMI UEFI BIOS
- PnP 1.0a, DMI 2.7, WfM 2.0, SM BIOS 2.7, ACPI 5.0
- Unique Features
- Support for APP Center
- * Available applications in APP Center may vary by motherboard model. Supported functions of each application may also vary depending on motherboard specifications.
- @BIOS
- EasyTune
- Fast Boot
- Game Boost
- ON/OFF Charge
- RGB Fusion
- Smart Backup
- System Information Viewer
- Support for Q-Flash Plus
- Support for Q-Flash
- Support for Xpress Install
- Bundled Software
- Norton Internet Security (OEM version)
- cFosSpeed
- Operating System
- Support for Windows 11 64-bit
- Support for Windows 10 64-bit
- Form Factor: E-ATX Form Factor; 30.5cm x 25.9cm
Pricing
$399.99 USD, Amazon
Manufacturer Description
“Featuring up to 20+1+2 phases digital power VRM design with each phase holding up to 105 amps and an improved Fins-Array III heatsink design, GIGABYTE’s Z690 AORUS lineup is geared with the best power design and thermal management to unleash the extreme performance and optimized overclocking ability on the new generation multi-core K series Intel Core processors.
The PCIe 5.0 PCBs, slots, and components are also implemented in GIGABYTE’s Z690 AORUS motherboards for enhanced performance and stability. The exclusive SMD memory slots with metal shielding mask for anti-interference and the BIOS setting of DDR5 memory overclocking offer more stable signals to memory, which enable users to boost XMP and overclocking performance with stability.
Select GIGABYTE Z690 AORUS motherboards offer feature-rich I/O with an integrated I/O shield as well as the newest Thermal Guard III design, Smart Fan 6 and much more. Performance, power management, thermals, audio, GIGABYTE Z690 AORUS motherboards check all the boxes for users seeking to take their computing firepower to the next level.”
Background (the blog part)
Over my past couple of personal builds, as well as some I’ve built for family and friends, I’ve almost exclusively used Asus ROG boards. I’ve found them to be well made, reliable, and I had become very familiar with the ROG UEFI layout. There is also the fact that as someone who does a lot of custom loop liquid cooling, I like to utilize coolant temp sensors if they are available on the motherboard, and almost every ROG board I’ve encountered has them. If you have ever done custom loop cooling and not utilized a coolant temp sensor, I highly recommend it.
Warning – boring and technical liquid cooling stuff follows.
When liquid cooling a PC your system fans are not cooling the CPU, at least, not in a relationship as directly as the fans are affecting the cooling in an air cooled solution. Liquid has a much higher thermal capacity than air, so it removes the heat very efficiently as it flows through your system to the radiator or radiators. Radiators also have a huge surface area to then dissipate the heat from the coolant which then flows back into the system and removes more heat. Much like the fins on an air cooled heatsink, a radiator still needs some airflow across its fins to lower the coolant temp as it flows through the coolant passages.
Without adequate airflow, a radiator will become heatsoaked and will no longer be able to dissipate heat from the coolant. The lower your coolant temp, the more thermal capacity a specific volume of coolant has, and will be able to transfer more heat within the loop. So in a liquid cooled system, your fans are actually dissipating heat from the radiator.
What all that means is that you don’t need your fans to ramp up and down to match your CPU or GPU temps. You want your fan speed to be based on your coolant temp. Having a motherboard that not only has a two pin temperature sensor, but also allows the fans to be controlled from use the readout from that sensor allows this level of control. The way I’ve set it up in all my builds over the last few years is to connect the pump to the motherboard’s CPU header, and then fix the rpm (on my current build, my D5 pump runs at a constant 3000 rpm).
Most motherboards will give you an alarm if they sense a malfunction there, and your pump is the one thing in your system that you want to know immediately if it stops. After that, I just connect my fans to the other motherboard headers, and then go into the UEFI (or the motherboards fan control software) and set fans speeds based on the coolant temp reading from the sensor. Using this method prevents the fans from constantly ramping up and down as your CPU temps rise and fall, but also won’t omit the effect of the GPU in the loop.
We now return you to your regular blog-type programming.
Okay, now that’s over with and I’m sure any of you who are still awake would like me to get on with it. To summarize, it’s very important to me that any motherboard have a two pin temp sensor connection if it is going be used in a liquid cooled system, and I knew that the Z690 ROG boards were going to have them, and I really like the ROG UEFI. Unfortunately, The pricing on the new ROG Maximus motherboards is simply ridiculous to me.
The Hero line has always been the low end of the Maximus line(or Crosshair line if you’re an AMD person). For Z690 the Hero has gone from being in the $300 to $400 range, to $600+. I just wasn’t willing to spend that much on a motherboard if I could find an alternative. I took a look at the ROG Strix line, and felt there were too many features missing from the Maximus line for those to be considered, so I began to look at other manufacturers.
While some may view them as ‘second rate’, I’ve actually had good luck on many AMD systems with ASRock boards, but ASRock doesn’t offer a coolant temp sensor on any Z690 boards they sell. I’ve personally had a very bad experience with MSI, and am reluctant to use one again in a personal system. Then I started looking into Gigabyte’s line of Z690 boards. Not only did they have a pretty wide variety, but they had some pretty high spec boards at a MUCH lower price than the ROG line, and most of them include at least one two pin temperature sensor connection. The Aorus Master I decided on actually has two. In addition to the ability to use temperature probes several of the Aorus boards had specs that compared favorably with the ROG Z690 Hero, but all cost at least $200 less.
As the process went on, I began to zero in on the Z690 Aorus Master board. Specification wise it had all the tools to either beat or perform on par with the ROG Hero. The Aorus Master has a much beefier power delivery system, as well as a MASSIVE set of heatsinks to keep all your VRMs and NVMe SSDs nice and cool. The only feature I found that the ROG Hero possessed that the Aorus Master was missing was the inclusion of an additional 6 pin PCIe power port to provide additional watts to the PCIe slot (in case you’re worrying about a GPU drawing over spec power from the slot). In the end, I didn’t think this was going to be a big need, even with an RTX 3090 in the slot.
A little more research had me leaning towards the Aorus Master, but I wanted to take a look at some reviews by people I respect who have actually had the board in hand and dug into it. While I may write for PCPer, We can’t review everything, and there are plenty of Tech review sites other than us which can be trusted. Among those I respect is Level 1 Techs, and they had done a deep dive on the Z690 Aorus Master. I had the board in my shopping cart within 5 minutes of seeing the end of Wendell’s review (YouTube link), and confirming that my previous research had put me on the right track.
First Impressions

I had not personally used a Gigabyte motherboard in some time, but the three I previously had were always extremely heavy due to the extra PCB layers Gigabyte likes to use. Even with that said, I wondered what else was in the box for the Z690 Aorus Master when I pulled it out of the shipping box. The answer to that is nothing other than standard accessories.
This is the heaviest, most dense motherboard I’ve ever used. The Aorus Master uses an eight layer PCB design, an all metal backplate, and the most overkill VRM cooling solution I’ve ever encountered on a motherboard. You may think I’m exaggerating, but the Aorus Master’s weight and mass is just shocking when you first pick it up. I don’t really have a scale I trust to be very accurate, below the weight of a human, but the Box weight for the Aorus Master is just shy of 7 lbs, and the heaviest accessory is the Wi-Fi antenna, so that should give you some idea.

Speaking of the included accessories, they’re mostly basic – Wi-Fi antenna, SATA cables, NVMe screws, badges and sticker, etc. – although it does include two 2-pin cables for connecting sensors to the motherboard. I’ll be honest though, I really wish motherboard manufacturers would stop packaging every little screw in its own plastic bag. It’s just incredibly wasteful.
The motherboard itself is an E-ATX form factor at 10.6’ wide (26.9cm) and 12.0’ tall (30.5cm). There is a plastic cover with RGB affects covering the internal rear I/O and a portion of the VRM heatsink, but the heatsink is so massive (and so overbuilt) I just don’t think that cover is going to have any negative effect.


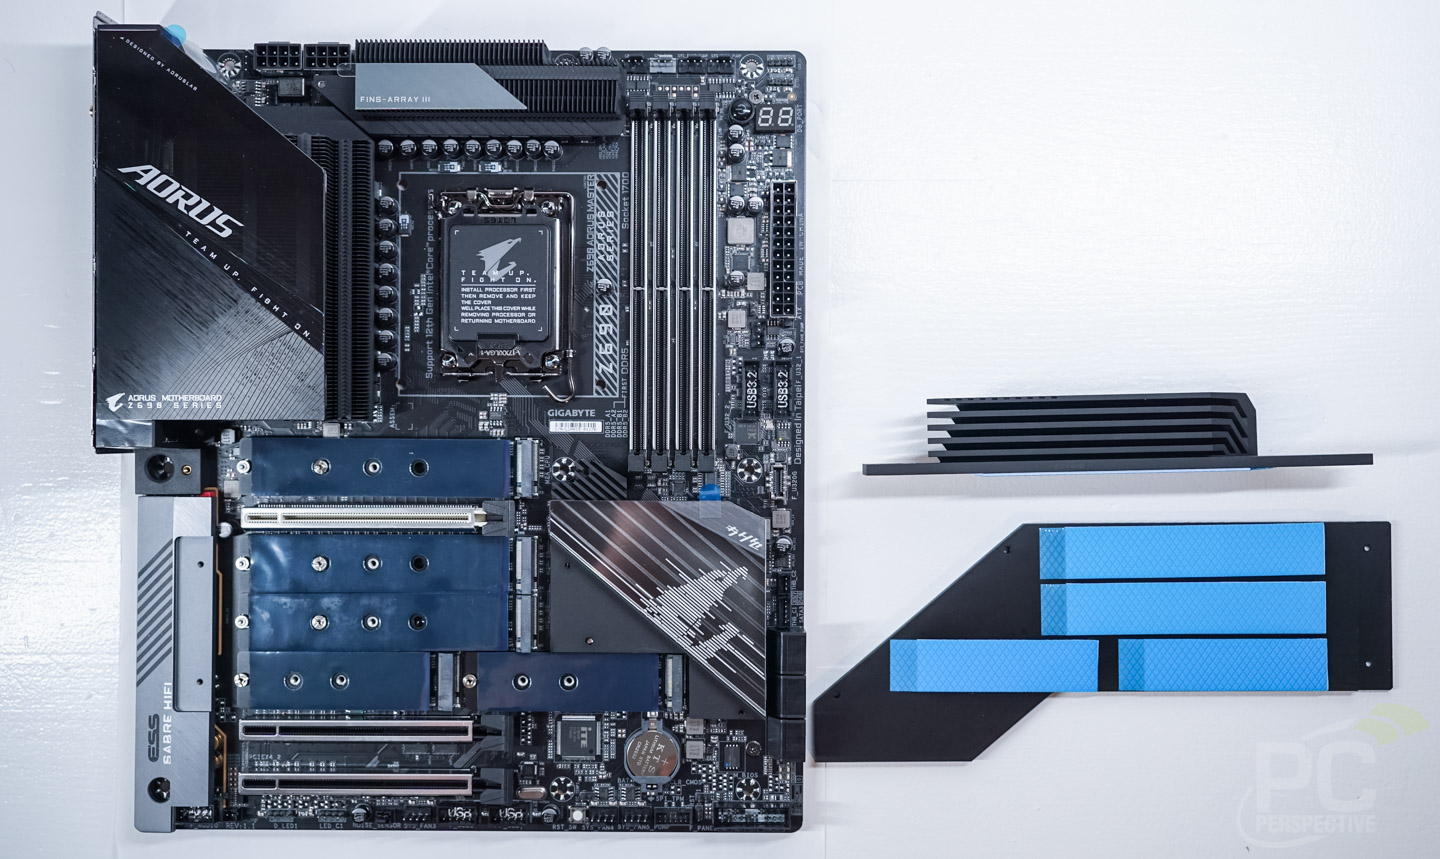


There is a HUGE heatsink over the primary M.2 slot (PCIe Gen 4×4, direct to CPU). All 5 of the M.2 slots have thermal pads top and bottom to accommodate NVMe drives with chips on both sides.
The motherboard has a full coverage back plate, and a built in I/O port cover:

On that I/O plate are the following:
- 4x USB 3.2 Gen 1 ports
- 5x USB 3.2 Gen 2
- 2x USB 3.2 Gen 2×2 Type C ports
- Clear CMOS button
- Q-Flash+ BIOS update button
- Aquantia 10GbE LAN port
- Wi-Fi 6E antenna connection
- DisplayPort Out (from the CPU’s onboard graphics)
- S/PDIF Audio output port
- Gold plated 3.5mm analog connectors for 7.1 audio
Both the Type C connectors on back and the internal C connector for the front panel connector are 20 Gbps. Speaking of internal connectors, in addition to the front panel type C, the Z690 Aorus Master includes:
- 2x 30 pin USB 3.2 headers
- 2x USB 2.0 front panel headers
- 10x 2 amp PWM fan headers (yes…TEN)
- 1x Thunderbolt 4 header
- 6x 6 Gbps SATA ports
- 1x Acoustic Sensor header
- 1x LED Diagnostic Code readout
- 1x Physical internal power button
- 1x Physical Reset button
- 1x Dual Bios switch
- 2x 12v RGB 4 pin headers
- 2x 5v ARGB 3 pin headers
And probably a few things I’m missing.
If you’re wondering what the acoustic sensor header is, the Z690 Aorus Master includes a small microphone that connects to this header for measuring the sound levels in the system. With the Smart Fan 6 control, you can monitor this, and even set the fan control to keep the sound level below a certain point.
The manual for the Z690 Aorus Master includes one of the better laid out and easiest to follow motherboard block diagrams, which shows all the connections and controls on the board. It is included here for your viewing pleasure:

UEFI
As mentioned above, I really like the Asus ROG UEFI layout and interface, above any I’ve previously used. I am happy to say that the Aorus UEFI is quite good and was very intuitive to navigate. The different headings are labeled in a similar way to other UEFIs I’ve used, and the controls a quite nice.

Z690 AORUS MASTER UEFI Boot

Z690 AORUS MASTER UEFI Easy Mode

Z690 AORUS MASTER UEFI Favorites

Z690 AORUS MASTER UEFI Smart Fan 6

Z690 AORUS MASTER UEFI Sys Info

Z690 AORUS MASTER UEFI Tweaker

Z690 AORUS MASTER UEFI Disable App Center auto DL 1

Z690 AORUS MASTER UEFI Disable App Center auto DL 2
The Gigabyte Smart Fan 6 controls in the BIOS as nice, but the fan graph is a little finicky to use with a modern mouse in the UEFI environment. Still, all the controls you need are hear, and if you’re going to set one fan profile and leave it, you can do that here and never need to install the desktop application for SmartFan 6.
I really only had one complaint with the UEFI. You can set the Debug LED to on or off. There is no setting that allows you to see the codes during post, but then be off once the system is booted. I personally like to see the codes as my system posts, especially if I’m troubleshooting, but I don’t want to see a bright red A0 glaring at me while I’m up and running, and that’s not possible with this board. Other than that I had no issues with the UEFI.
Summary
I’m going to save all the performance testing for the final part of the upgrade blog, but for now I’ll just say that after a few days with this motherboard, I’m extremely happy with my decision.

I’ve had zero issues with a failure to boot, or any apparent bugs during operation. If you’re in the market for a mid to high level board, I don’t think you’ll find a better quality Z690 motherboard for the money, certainly not one with all the features that the Aorus Master has.

(Stay tuned for the next installment of Kent’s personal upgrade blog, which has turned into a full-scale review of this Gigabyte Z690 Aorus Master motherboard, at least for the time being. I’m curious as to how this impressive-looking board performs, and I wish I had known in time to demand a photo of the motherboard on a scale to prove the 7 lb claim. The build has probably progressed far beyond the point of easy removal at this point. – SP)
Review Disclosures
This is what we consider the responsible disclosure of our review policies and procedures.
How Product Was Obtained
The product was purchased by the author of this review.
Company Involvement
GIGABYTE had no control over the content of the review and was not consulted prior to publication.
PC Perspective Compensation
Neither PC Perspective nor any of its staff were paid or compensated in any way by GIGABYTE for this review.
Advertising Disclosure
GIGABYTE has not purchased advertising at PC Perspective during the past twelve months.
Affiliate Links
If this article contains affiliate links to online retailers, PC Perspective may receive compensation for purchases through those links.


